
Update Your Server Host Keys
By: Roger Creasy
If you maintain a VPS, hopefully you are aware of the continuous attack attempts. As one measure to keep your server secure you should periodically change your server's host keys. If your server has been compromised, you definitely want to change your keys. Also, if you are using an older key encryption, you'll want to update your keys. Don't be concerned; the process is not difficult. I will walk you through step-by-step.
The host key is used in the part of the SSH handshake where the server identifies itself to the client. A compromise of your host keys can allow a man in the middle attack. Someone could identify themselves as your server and intercept the ssh traffic between your computer and the server.
Before you begin, I am assuming that you are at least minimally familiar with SSH, the command line, and Linux. Also, you should have either physical access or console access to your server. (Console access is the access you get from your provider's web site, the terminal access there). If you make a mistake, you could lock yourself out of SSH and may need this alternative access. So, don't make mistakes.
Our first step is to delete the existing host keys. SSH into your server and navigate to /etc/ssh/. Do an ls -la and take a look at the files in the directory. You should see one or more files in the format ssh_host_*_key. These are your host keys. Lets delete them. Scary. I know. Don't worry. Run the command below to delete all your host keys. Again, run this command on your server in the /etc/ssh directory.
rm ssh_host_*_key*
Enter ls -la again. The old keys should be gone.
Now, we need to generate new keys. We will generate only 2 types of keys - rsa and ed25519. These are currently the most secure. To generate the keys, run the commands below. You are still working on your sever and in the /etc/ssh directory.
ssh-keygen -t ed25519 -f ssh_host_ed25519_key -N "" < /dev/null
ssh-keygen -t rsa -b 4096 -f ssh_host_rsa_key -N "" < /dev/null
The first command generates our ed25519 key, the second command generates the rsa key. The -t switch tells keygen that the type will follow. The -f switch precedes the filename for the key. The -b precedes the size of the key (for rsa only). -N "" gives the passphrase - we don't want one here. Finally, < /dev/null throws away any output. Make note of the SHA fingerprints for your keys. You will need these in a bit.
Your server now has its new keys! But, we aren't finished yet. End your SSH session then start a new one. The keys are only used to set up the connection. So, we need to leave the SSH session and start a new one using our shiny new keys. When you try to connect you should see something like the screenshot below.
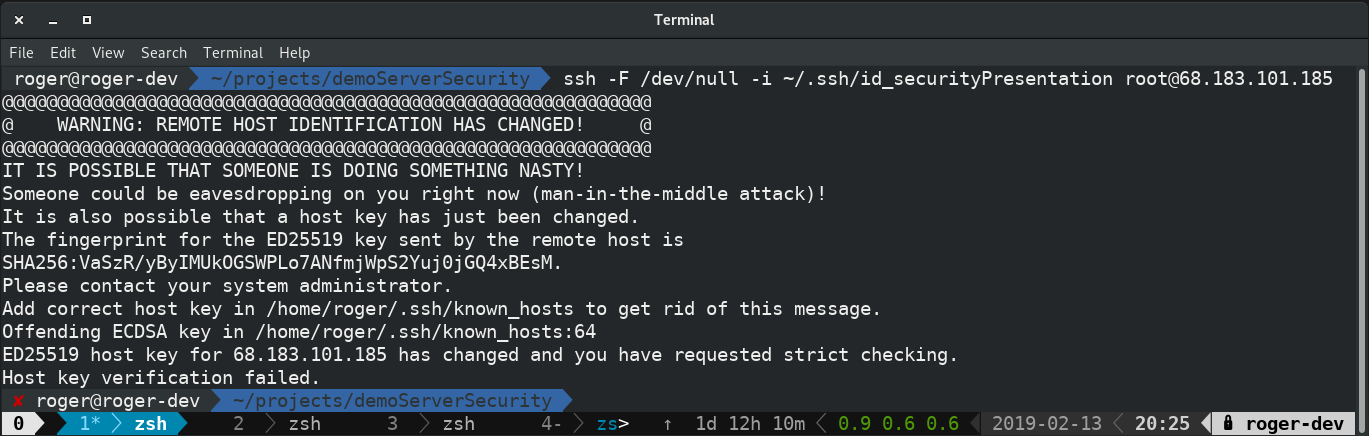
Normally if you see the above you should be concerned. It means that something has gone awry regarding your keys. Either your server has been changed, or someone is attempting a man-in-the-middle attack. But, we are seeing this now because we changed the keys and they no longer match what we have on our local computer. We need to delete our local files and accept new keys to replace those local files. If you read the message you will see exactly what is generating the error.
Take a look at the line Offending ECDSA key in /home/roger/.ssh/known_hosts:64 That line tells us exactly where the problem is, namely in the file /home/roger[or your user]/.ssh/known_hosts and the error is on line 64. The exact location of the file may differ based on your OS. Open your favorite text editor (mine is vim) and delete that line. I would open the file and go to the line with the command vim /home/roger/.ssh/known_hosts +64 (see why I use vim?) Again, simply delete that line from the file.
Now SSH into the server again. You should see a message like the one in the screenshot below.
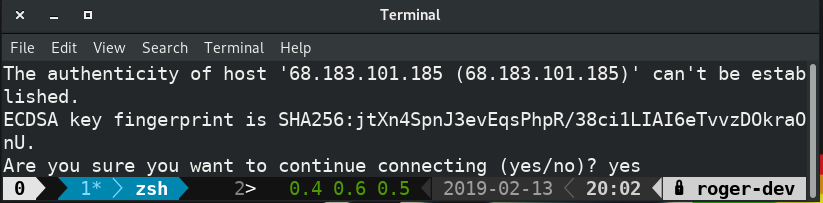
Compare the fingerprint to the one you received when you generated the key. They should match. If they do, enter yes and continue. Congratulations! You are now using your new host keys.
If they do not match, carefully go through the process above again. To be completely safe, do this from your console. Be certain that you follow each step exactly.
I hope you find this helpful. If you do, please share it with others.
If you see room for improvement, let me know. The best place to find me is on Twitter @RogerCreasy
Thanks for reading!